
Note: The information provided in this paper supplements the existing user guide provided in the operator’s manual and clinical guidelines. Do not omit the required standard pre/post-operative steps and intra-procedural safety measures.
Introduction
The CO2 laser has remained the Gold Standard for full and fractional laser resurfacing. With proper settings and vigilant attention to endpoints, predictable improvements can be achieved in skin resurfacing and in indications such as warts, acne scars, wrinkles, syringomas and other lesions. Furthermore, the CO2 laser can also be used to replace the scalpel in procedures such as blepharoplasty.
Most modern CO2 lasers are capable of covering a broad range of applications by using a variety of spot sizes, depths and patterns. One especially versatile laser is the AcuPulse™ by Lumenis. Relying on unique scanning technology, this laser can deploy a wide range of patterns, spot sizes, and dwell times and/or pulse widths. It can deliver energy in the form of a continuous wave (CW), maintaining a relatively low power for extended durations, or in the form of a proprietary SuperPulse™, discharging a high-power burst of energy in a very short amount of time. The SuperPulse™ is so effective that it can penetrate up to 1 mm into the skin with a single burst of energy, lasting no longer than 0.3 msec, which minimizes residual thermal damage (RTD). With respect to CO2 laser resurfacing, the literature suggests that pulse duration should be shorter than or equal to the thermal relaxation time (TRT) of tissue. Experimental data supports this argument, showed that with longer pulses (50 msec versus 0.6 msec), greater RTD was observed. The primary advantages of shorter pulses and/or dwell times are 1) spatial confinement of thermal injury and 2) lowering of the ablation threshold, both achieved by the AcuPulse™ thanks to SuperPulse™ technology.
The AcuPulse™ can be used with two advanced scanners; the SurgiTouch™, designed for full ablative resurfacing applications, and the AcuScan120™, designed for fractional ablative resurfacing applications. The SurgiTouch™ scanner is configured with three handpieces of different spot sizes. The 125, 200 and 260 mm (focal distance) scanning handpieces enable the SurgiTouch™ scanner to generate microbeams ranging between 0.26-0.55 mm in diameter. The microbeams are scanned onto the skin in a spiral pattern, such that no portion of the tissue is exposed for longer than the TRT. The AcuPulse™ enables three timed exposure modes with the SurgiTouch™ scanner; continuous exposure, a single exposure (per footswitch press) and repeated exposures. The time delay between two consecutive exposures is set by the user. Conversely, the AcuScan120™ scanner is capable of generating 0.12 mm microbeams, as well as 1.3 mm spots, in fractional patterns. The smaller diameter microbeams are used when deep skin penetration is required, while the larger spots affect the skin more superficially. A combination mode delivers the 0.12 mm and 1.3 mm beams sequentially in the same area, such that deeper and more superficial pathologies can be treated in the same pass. Consequently, for any of the fractional applications, the AcuPulse™ is notably hassle-free, requiring only the one scanner and no additional handpieces. The AcuPulse™ enables either single exposures with the AcuScan120™ scanner, or repeated exposures for rapid fractional coverage of larger areas. The time delay between two consecutive exposures is set by the user. Finally, an incisional 125 mm handpiece, producing a 0.26 mm diameter microbeam, can be used on its own, requiring neither of the scanners, for making accurate surgical incisions with minimal bleeding, due to the coagulative, hemostatic nature of the CO2 laser’s interaction with the tissue. This also allows for better visibility of the treated area and less labor cleaning and sterilizing equipment, due to eliminating the need for a scalpel.
The following table summarizes the information regarding AcuPulse™’s scanners and handpieces:
| Scanner | Handpiece | Beam Diameter | Spot Size |
| SurgiTouch™ (full) | 125mm | 0.26mm | 0.6 – 7mm |
| 200mm | 0.42mm | 4 – 11mm | |
| 260mm | 0.55mm | 5 – 15mm | |
| AcuScan120™ (fractional) | None | 0.12mm | 0.12mm, 1.3mm |
| None | Incisional 125mm | 0.26mm | 0.26mm |
The AcuPulse™’s user interface provides 10 built-in treatment modes to address numerous applications, including over 30 FDA-cleared indications:
| Mode | Scanner | Application | Setting Range | |||
| FeatherTouch | SurgiTouch™ CW mode | Shallow full resurfacing | Handpiece | 125mm | 200mm | 260mm |
| Round scan size (mm) |
3-7 | 4-11 | 5-15 | |||
| Recommended power (W) | 12 (for 5mm default size) | 24 (for 8mm default size) | 36 (for 10mm default size) | |||
| SilkTouch | SurgiTouch™ CW mode | Deeper full Resurfacing | Handpiece | 125mm | 200mm | 260mm |
| Round scan size (mm) |
3-6 | 4-9 | 5-12 | |||
| Recommended power (W) | 9 (for 6mm default size) | 12 (for 7mm default size) | 18 (for 9mm default size) | |||
| FineTouch | SurgiTouch™ CW mode | Precise ablation of irregular pigmented lesions at various depths | Handpiece | 125mm | ||
| Round scan size (mm) | 0.6, 0.9, 1.2, 1.5 | |||||
| Power range (W) | 5-40W | |||||
| ToeTouch | SurgiTouch™ CW mode | Onychomycosis | Handpiece | 125mm | ||
| Round scan size (mm) | 3-6 | |||||
| Power range (W) | 5-15W | |||||
| Paint | SurgiTouch™ CW mode | Painting technique by moving the HP continuously over the tissue for large and thick tissue removal | Handpiece | 125mm | 200mm | 260mm |
| Round scan size (mm) |
2-4 | 4-6 | 5-9 | |||
| Recommended power (W) | 7 | 18 | 34 | |||
| Deep | AcuScan120™SP mode | Acne scars, wrinkles and deep fractional resurfacing | Hexagon scan size (mm) | 4-10 | ||
| Energy range (mJ) | 7.5-30mJ | |||||
| Density range (%) | 5-25 | |||||
| Superficial | AcuScan120™CW mode | Superficial fractional resurfacing | Hexagon scan size (mm) | 5-10 | ||
| Energy range (mJ) | 50-170mJ | |||||
| Density range (%) | 40, 60 | |||||
| Combo | AcuScan120™ SP and CW modes | Acne scar, wrinkles and combined superficial and deep fractional resurfacing | Same combined setting ranges as for individual Superficial and Deep | |||
| StretchTouch | AcuScan120™ SP mode | Ablation and coagulation for the treatment of skin furrows and other textural irregularities | Rectangle scan size (mm) | 4×2-10×5 | ||
| Energy range (mJ) | 10-25mJ | |||||
| Density range (%) | 5-15 | |||||
| Bleph | None (125 mm incisional handpiece) SP or CW mode | Blepharoplasty | Power range (W) | 5-7 |
Syringomas
Definition of condition and prevalence
Syringomas are skin-colored or yellowish dermal papules, usually smaller than 3 mm and located on the lower and sometimes on the upper eyelids in a sporadic pattern. Syringomas are benign adnexal tumors, derived from the intraepidermal portion of the eccrine sweat ducts. They have distinctive histopathological features- normal epidermis overlying a dermis that is filled with multiple ducts embedded in a fibrous stroma. The ducts are lined by an inner layer of flattened epithelial cells. Some have a tadpole-like appearance, due to the presence of a comma-like tail, which is formed by the cells projecting from one side of the duct into the stroma. Ductal lumina are usually filled with an amorphous material.
Syringomas affect approximately 1% of the population and their prevalence is higher in females than in males. Because the disease consists as successive crops of lesions, patients must be informed that other lesions may appear, regardless of those that have been removed.
Patient preparation and treatment limitations
The treatment must not be performed if a syringoma is closer than 2-3 mm to the nasolacrimal duct or if positioned along the lower eyelids margins near the inner canthus.
Use with caution on skin of colour.
Patient should wear intracorneal eye shields.
Treatment shall be conducted under local anesthesia of the entire eyelid. Anesthesia shall be injected intra-muscularly, rather than between skin and muscle. Injection of anesthesia per lesion shall be avoided as it may inflate the lesions and hamper accurate treatment.
Treatment procedure
1. Connect the SurgiTouch™ scanner with the 125 mm blue scanner handpiece.
2. Select settings as per following lesion size:
| ProcedureStep No. | Lesion Size (mm) | Mode | Scan Shape | Spot Size (mm) | Emission Mode(CW/SP) | Power (W) | Operation Mode |
| 1 | all | FineTouch | Circle | 0.6 | CW | 5 | Repeat |
| 2 | ≤1.5 | FineTouch | Circle | 1.5 | CW | 6 – 8 | Repeat |
| 1.5 – 4 | FeatherTouch | Circle | 3 | CW | 10 – 14 | Repeat |
3. Step 1: Drill a hole inside each lesion while stretching the skin.
4. Step 2: Ablate the raised part of the lesion.
5. Wipe the ablated skin with gauze moistened with saline solution.
6. Dry wipe the skin with gauze.
7. Switch to the AcuScan120™ scanner for lower peri-orbital fractional resurfacing, enter Combo mode.
8. Select settings:
| Energy (mJ) | Density (%) | CW / SP | |
| Deep | 7.5 | 10 | SP |
| Superficial | 60 – 70 | 40 | CW |
9. Treat the whole pre-septal area of the eyelid up to the orbital margins. On the temple area and on the pre-orbital area reduce the settings to feather the treatment (Deep 7.5 mJ, density 10%, Superficial 50 mJ, density 40%)
Post-op care
An ocular antibiotic ointment must be applied on the treated lower eyelids for the next 3-5 days. An evident swelling of the eyelids for the following 2-3 days should be expected. Erythema can last for 7-10 days. SPF 50+ must be applied on the skin before makeup for at least 2 months after the procedure.
Treatment notes and conclusion
The logic behind the aforementioned technique is to create a “T” shaped ablation tunnel inside each lesion. The heat generated by the T shaped ablation tunnel, together with the dryness of remaining tissue surrounding the ablated hole are enough to destroy the entire lesion. It is not necessary to fully ablate the lesion, which may increase risks of scarring and pigmentation disorders.
The fractional treatment, on top of the above, has three purposes:
a) Improve the skin texture of the eyelids.
b) Reduce the short term visibility of the treated small areas.
c) Reduce the incidence of recurrences.
The AcuPulse™ permits carrying out an extremely precise treatment, allowing the operator to drill a deep fine hole, to gently ablate the convex part of the lesions and to perform a dual layer fractional treatment with the same device and in rapid succession.
Case report

(Left) Baseline: A 37-year old female patient, skin type III. Presents syringomas plus moderate skin laxity of the lower eyelids. (Right) Postoperative Results – 6 months post one session. Combination of SurgiTouch™/AcuScan120™
Acne Scars
Definition of condition and prevalence
Inflammatory acne is a common condition that affects up to 80% of people between 11 and 30 years of age and up to 5% of older adults. Acne scarring is also a common condition that results from long-lasting and uncured inflammation, with subsequent collagen degradation, dermal atrophy, and fibrosis. Atrophic acne scarring has been divided into 3 types; icepick scars, rolling scars, and boxcar scars. A multitude of modalities have been used to treat atrophic acne scars, including punch excision, dermabrasion, chemical peels, fillers, and traditional ablative and non-ablative lasers. Ablative full skin resurfacing with CO2 and Er:YAG lasers was previously considered the gold standard for laser treatment of atrophic acne scars. However, while effective in re-contouring the skin and improving the appearance of scar texture, treatments are limited by significant downtime, prolonged erythema and potential unwanted adverse effects, such as post-inflammatory hyperpigmentation, hypopigmentation, and scarring. Ablative fractional resurfacing creates microscopic treatment zones (MTZ) to stimulate a wound-healing response. With this technique, the tissue surrounding each column is spared, ultimately resulting in rapid epidermal regeneration with reduced downtime and adverse reactions compared to treatment with traditional full ablative techniques.
Patient preparation and treatment limitations
- Patients with boxcar or rolling scars are optimal candidates for the treatment.
- Icepick scars, characterized by punctate deep scars, usually caused by deep cystic acne, are difficult to resurface with laser, because the base of the scar is deep with very steep sidewalls. The most effective treatments have remained punch excision with suturing or the ‘Cross’ method, which involves spot application of a very strong chemical peeling agent to stimulate the growth of collagen to help ‘fill in’ the icepick depressions over time.
- Patients must be informed that, depending on the severity of the lesions, more than one laser treatment could be necessary to obtain an improvement. Generally, two laser treatments may be spaced apart by 3-6 months.
- Use with caution on skin of colour and whenever the area to be treated is extra-facial.
- Patients may be prescribed antibiotic (tetracycline), antiviral (valacyclovir) and antifungal (fluconazole) drugs starting the day before the treatment.
- A precious tip to shorten the treatment time and clearly locate the depressions is to mark each scar with a surgical pen with the patient in a sitting position before applying anesthesia.
- Preoperatively, apply a topical anesthetic cream and follow the guidelines of the manufacturing healthcare professional for application dosage, occlusion and timing.
Treatment procedure
1. Carefully remove the anesthetic cream, disinfect the skin and make sure it is perfectly dry prior to the treatment.
2. Connect the AcuScan120™ scanner.
3. Select settings for the various steps as indicated in the table below.
| Procedure Step No. | Mode | Pattern, Shape Size | Energy (mJ) | Density (%) | Emission mode (CW/SP) |
Notes |
| 1 | Deep | A small square, 3 | 20-30 | 5 | SP | Base of scar |
| 2 | Combo, (Deep part) | Largest hexagon pattern, 10 | 12.5-17.5 | 10-15 | SP | Cover entire affected area |
| Combo, (Superficial part) | Largest hexagon pattern, 10 | 90-120 | 60 | CW | Cover entire affected area | |
| 3 | Superficial | Largest hexagon pattern, 10 | 70-90 | 40 | CW | Cover remaining cosmetic units |
4. Step 1: Enter the Deep mode. Choose a small square pattern to affect only the base of each scar. Shape size 3 is usually optimal. Lower energy by at least 30% on patient with skin of color.
5. Step 2: Change to Combo mode. Choose the largest hexagon pattern (10) with combined Deep and Superficial modalities to cover the entire area affected by acne scars; usually cheeks, chin and temple areas. Use low energy levels for thin skin, extra-facial areas and/or dark skin. The use of high energy levels requires the selection of low density levels.
6. Step 3: Change to Superficial mode. Use the largest hexagon pattern (10) and proceed to cover the remaining facial cosmetic units not affected by acne scars. Skip step 3 for extra-facial areas.
Post-op care
Immediately after the treatment, gauzes moistened with cold saline solution must be gently applied (without rubbing) on the skin for 15-20 minutes.
A soothing skin balm without colorants, fragrance nor preservatives must be subsequently applied on the skin.
The patient must be instructed to avoid sun light for the next 4-6 days, must repeatedly apply the ointment during this period and can wash their face with a gentle cleanser and lukewarm water starting the day after the procedure. Post-op medication may be continued as per the physician’s discretion.
Edema and erythema may last from 5 to 14 days.
Treatment notes and conclusion
The Combo mode of the AcuPulse™ is a modality that allows simultaneous treatment of deep and superficial layers of the skin (with the freedom to choose settings for each of them individually). Moreover, with its high versatility and customization possibilities, the Combo mode allows quick treatment procedures, minimizing operating times and treatment discomfort to the patient. The accuracy of the AcuScan120™ is a differentiator on its own and ensures an excellent safety profile.
Case report
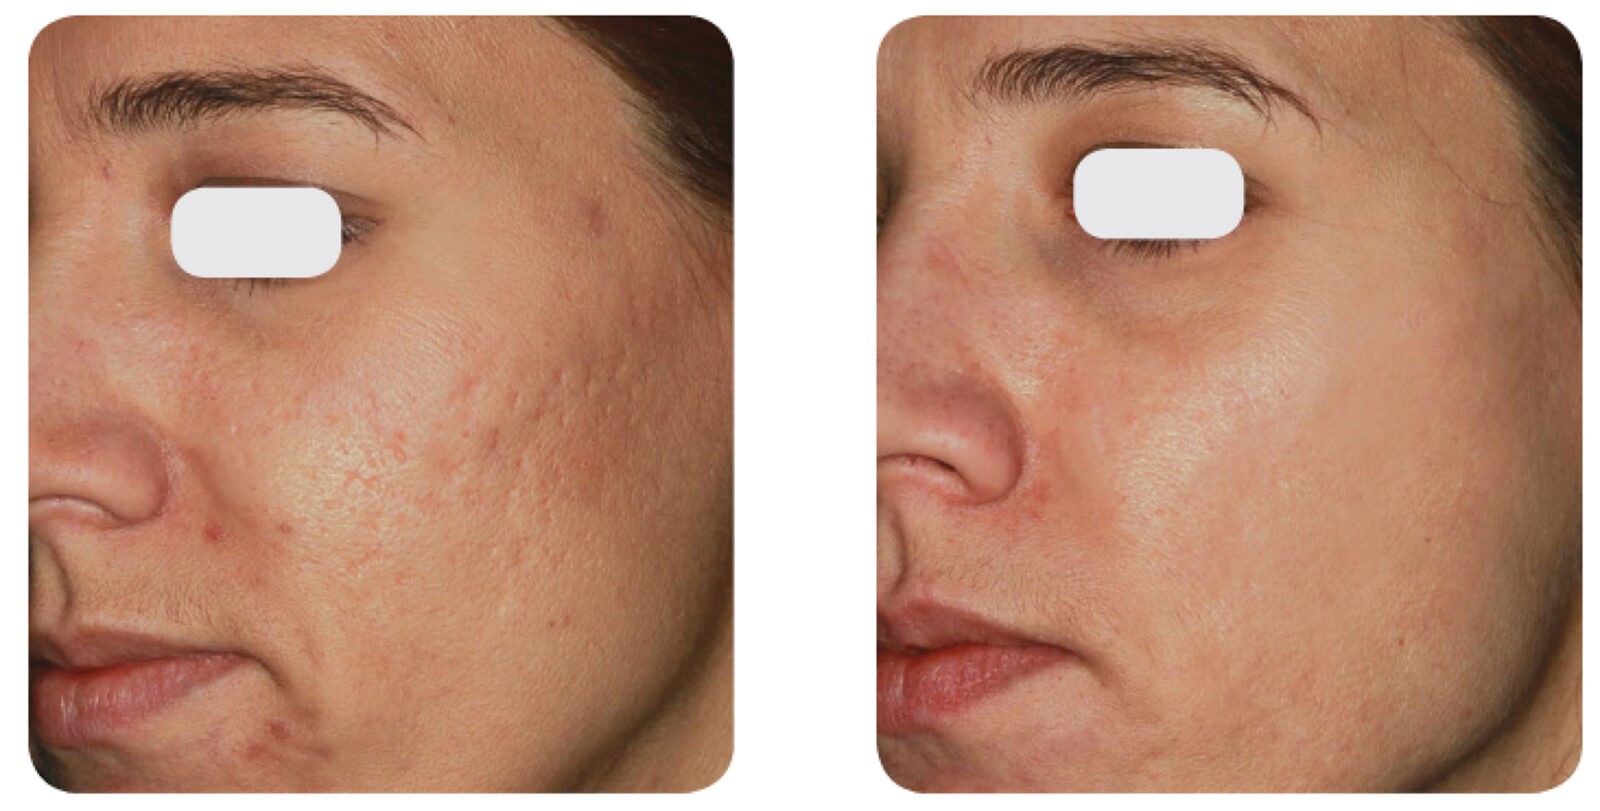
(Left) Baseline: A 27-year old female patient, skin type IIIa. Presents mixed acne scars mostly on the cheeks. (Right) Postoperative Results: 6 months post one session.
Peri-oral wrinkle treatment
Definition of condition and prevalence
Laser resurfacing of facial rhytids has become a popular treatment option for many patients with wrinkles. Targeted areas of treatment include the two most obvious and noticeable areas; the peri-orbital and the peri-oral skin. Peri-oral lines appear primarily due to loss of normal collagen and elastic fibers and secondarily due to ultraviolet light (tanning or chronic exposure) and oxidant (smoking) damage. In addition, this is an area where muscle activity results in repetitive folding/creasing of the skin with speech and expression. Occupations involving the repetitive use of the oral muscles, such as musicians, and habits such as sipping and drinking with straws also exacerbate these lines.
Patient preparation and treatment limitations
- Patients with a history of HSV must be given preventive medication
- All other pre-medication prior to ablative procedures are at the physician’s discretion
- Patient should use topical 0.05% retinoic acid for 3-4 weeks prior to the treatment, with the topical being stopped 5 days prior to the procedure to avoid any irritation left during the treatment procedure
- Using a surgical pen, pen-mark the rhytids before applying the anaesthesia
- Treatment should be conducted under local anesthesia (1% lidocaine with epinephrine and with/without hyaluronidase.
- Use with caution on skin of colour
Treatment procedure
1. Carefully remove the anesthetic cream, disinfect the skin and make sure it is perfectly dry prior to the treatment.
2. Connect the AcuScan120™ scanner.
3. Select settings for the various steps as indicated in the table below.
4. Step 1: enter the Deep mode. Fit a line scan pattern into the furrow of the rhytids. For deeper lines, select higher energy levels, compensating with lower density levels.
5. Step 2: enter the Combo mode. Select a hexagon or square shape and cover the entire cosmetic unit.
| Procedure step no. |
Mode | Scan shape | Energy (mJ) | Density (%) | Emission mode (CW/ SP) |
| 1 | Deep | Line | 15-20 | 15-20 | SP |
| 2 | Combo (Deep part) | Hexagon or square | 15-20 | 10-15 | SP |
| Combo (Superficial part) |
80 | 20 | CW |
Post-op care
Ice or cold packs can be used over the treated areas 20 minutes every hour for the first 3 to 4 hours following the treatment, if painful.
Proceed with antiviral medication.
Oedema and erythema may last from 6 to 18 days.
Treatment notes and conclusion
The logic behind the aforementioned technique is to create a deep ablation effect inside each wrinkle to ensure deep remodelling, followed by combined deep and superficial passes over the entire area to achieve a levelling of the hills.
The AcuPulse™’s flexibility enables designing a complex treatment scheme, which allows performing deep and superficial facial resurfacing in one elegant pass, using a single scanner.
Case report
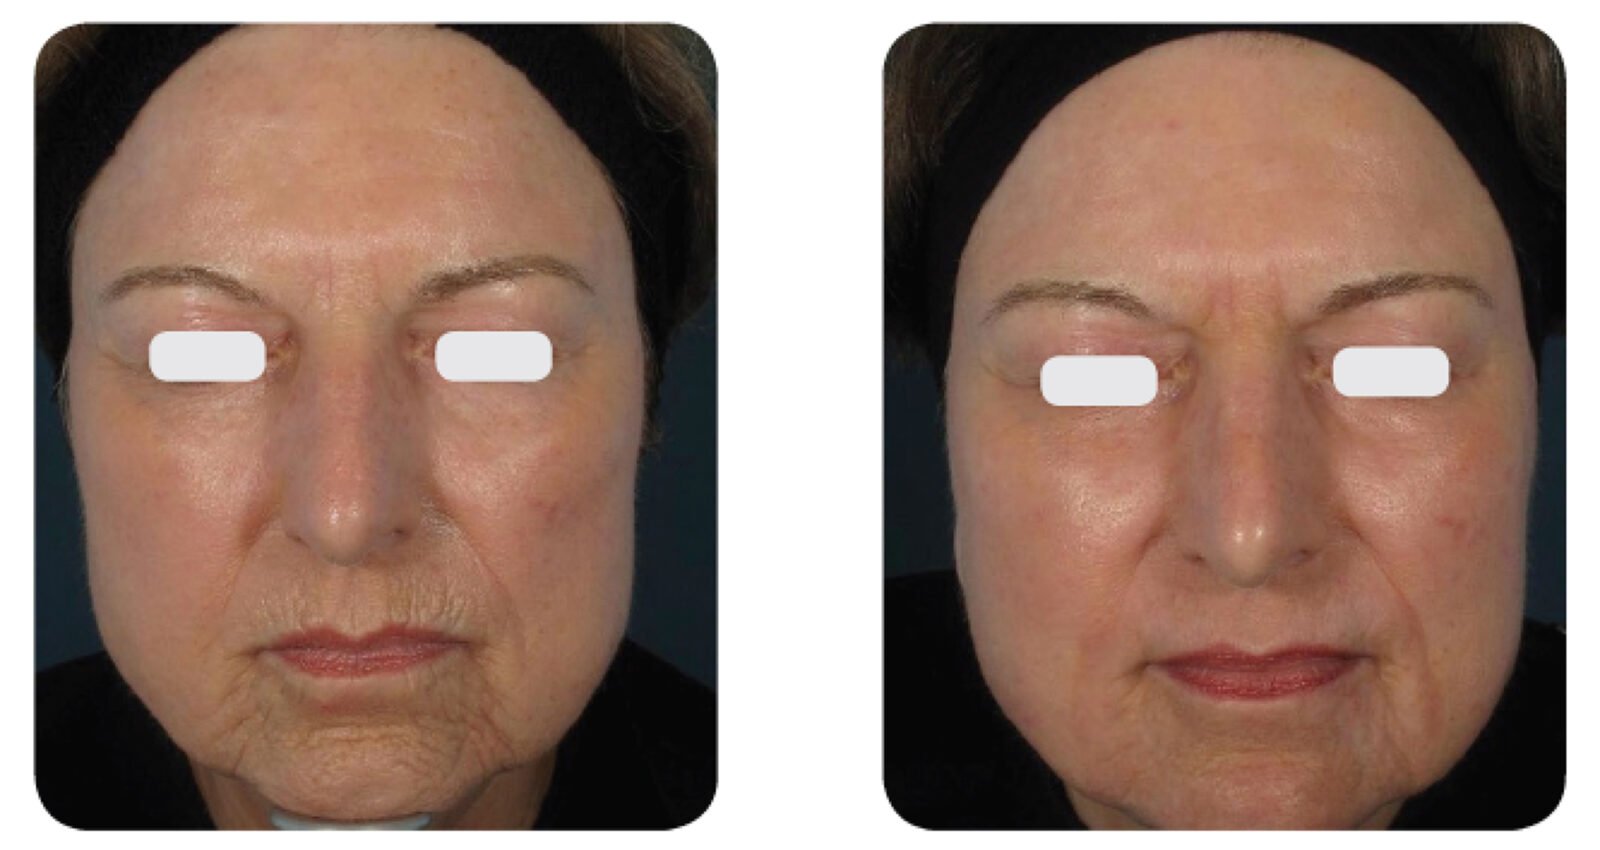
(Left) Baseline: A 52-year old female patient, skin type II. Presents mild to moderate photo aging signs on the full face, with marked peri-oral rhytids. (Right) Postoperative Results: 6 months post one session. Combo mode using the AcuScan120™.
Blepharoplasty
Definition of condition and prevalence
Eyelid skin is amongst the thinnest in the body (~ 0.05 mm with little underlying subcutaneous tissue). By its very nature, it is dynamic and moves frequently with gaze and blinking. It is also located in an anatomic region that receives extensive exposure to sunlight. All these factors predispose eyelid and peri-ocular skin to actinic injury with thinning, loss of elasticity, dyspigmentation and the development of fine wrinkling. Patients often blame a chronic lack of sleep on “looking tired” when in fact they are concerned about extrinsic aging factors such as excessive eyelid skin (dermatochalasis), eyebrow ptosis, or dark circles under the eyes. Some patients will be concerned about lower eyelid bags, festooning or bulging orbital fat pads.
Surgery to correct eyelid skin redundancy is historically a high-volume procedure. In a 2011 survey from the American Society of Plastic and Reconstructive Surgery, eyelid surgery was in the top five cosmetic surgical procedures performed.
Upper eyelid:
Normally the upper eyelid margin covers the superior 1-2 mm of the cornea while the lower eyelid margin rests at the corneoscleral limbus. Upper eyelid position is usually judged relative to the pupil or superior limbus. There is a wide range of “normal” with some patients having naturally low upper lids while others have a wide palpebral fissure. Blepharoptosis is the term used to describe a lid that is in a lower than desirable position. A ptotic upper eyelid may occlude some, none, or even the entire pupil.
Lower eyelid:
With increasing laxity, the lid will sag, visibly exposing the sclera below the inferior corneoscleral limbus. This condition is best known as ectropion. Lower eyelid integrity may be assessed with the “snap” or “pinch” tests. The snap test is performed by pulling the lid downward and letting the lid return to its resting position. The pinch test, somewhat less popular than the snap test, is performed by pinching the lower eyelid between the thumb and forefinger and distracting it from the globe. Less than 6mm of displacement of the skin from the globe is considered normal.
Patient preparation and treatment limitations
- Patients with conditions including, but not limited to the following should be further evaluated or dissuaded from treatment: chronic dry eyes, keratoconus, traumatic eye injury, and exophthalmos
- Carefully measure the excess and redundant skin of the upper lids producing redundancy and mark the incisions for fusiform excision with a marking pen
- Using surgical calipers measure the supratarsal incisions to achieve an incision, symmetrical from the ciliary margin bilaterally
- Use topical Proparacaine drops to anesthetize the cornea. Inject local anesthetic (i.e. lidocaine 1% with 1:100,000 epinephrine, with or without hyaluronidase) to the upper eyelid areas
- Use sterile intra-ocular metal shields coated with sterile ophthalmic lubricant to protect the globes bilaterally
- Use with caution on skin of colour.
Treatment procedure
1. Connect the incisional 125 mm black handpiece directly to the articulated arm of the AcuPulse™ device.
2. Enter Bleph mode.
3. Select settings for the various steps as indicated in the table below.
| Procedure Step No. |
Mode | Emission mode | Power (W) | |
| 1-6 | Bleph | CW | 5 | |
| 7 | Surgical Suture | |||
| 8 | Mode | Emission mode | Energy (mJ) | Density (%) |
| Combo(Deep part) | SP | 10 – 12.5 | 10 | |
| Combo(Superficial part) | CW | 60 – 70 | 40 |
4. Step 1: Incise and remove the excessive skin from the upper eyelid keeping focal distance. A thin strip of orbicularis oculi muscle is excised in order to expose the orbital septum.
5. Step 2: Obtain hemostasis using the same handpiece in a defocused mode.
6. Step 3: Identify the orbital septum, and expose herniated orbital fat. Carefully excise the abnormally protruding positions in the medial pocket with the laser.
7. Step 4: Meticulously cauterize stalk again defocusing the handpiece.
8. Step 5: Perform a similar procedure, exposing herniated portions of the nasal pocket.
9. Step 6: Carefully obtain hemostasis on the upper lid area. This can be accomplished with the laser in defocused mode.
10. Step 7: Close the Upper eyelid incisions with a running 6-0 non-absorbable prolypropylene suture.
11. Step 8: Connect the AcuScan120™. Enter Combo mode to fractionally treat the whole lower eyelid surface. Treat from the lateral canthus in a medial direction to the nasofacial sulcus. Inferior border is the infra-orbital crease and superior border is the 2-3 mm from the lid margin.
Post-op care
Post–operatively, sutures should be secured into place with thin flesh-colored steristrips.
Ice or cold packs should be used over the surgical sites 20 minutes every hour for the first 3 to 4 hours following the surgery. A soothing skin balm without colorants, fragrance nor preservatives or erythromycin ophthalmic ointment should be used on all suture lines twice daily to expedite healing and minimize desiccation of the wound. The balm is also used on the laser resurfaced skin multiple times daily for at least 3-4 days (with gentle cleansing between two applications), then a switch can be made to a cream which is slightly less occlusive. The patient must refrain from lifting heavy objects, strenuous activities, or bending over for a period of one week following the procedure. Sutures are removed generally at 5-7 days post procedure. Avoidance of sun/UV light exposure is paramount to protect the skin during the healing phase. Sunscreen and large sunglasses are ideal for this purpose.
Swelling and erythema may last from 2 to 4 weeks.
Treatment notes and conclusion
The ability to perform precise incisional cutting with controlled hemostasis, superficial and deep skin resurfacing with the same device is ideal for any surgeon working in the peri-orbital area. The AcuPulse™ is therefore a unique and comprehensive solution for performing Blepharoplasty and concurrent peri-orbital resurfacing.
Case report 1 – upper and lower lid blepharoplasty

(Left) Baseline: A 49-year old female patient, skin type III. Presents marked symmetric and bilateral dermatochalasia on the upper lids. Moderate festooning was noted of the lower eyelids with mild skin laxity. (Right) Postoperative Results: 3 months post one session. The entire ellipse of skin was elevated and incised with laser. A thin strip of orbicularis oculi muscle was excised in order to expose the orbital septum. The defect in the orbital septum was identified and herniated orbital fat was exposed. The festooning fat pads in the medial lower lid were exposed through a conjunctival approach and excised with laser, after which the stalk was meticulously cauterized with laser in a defocused mode.
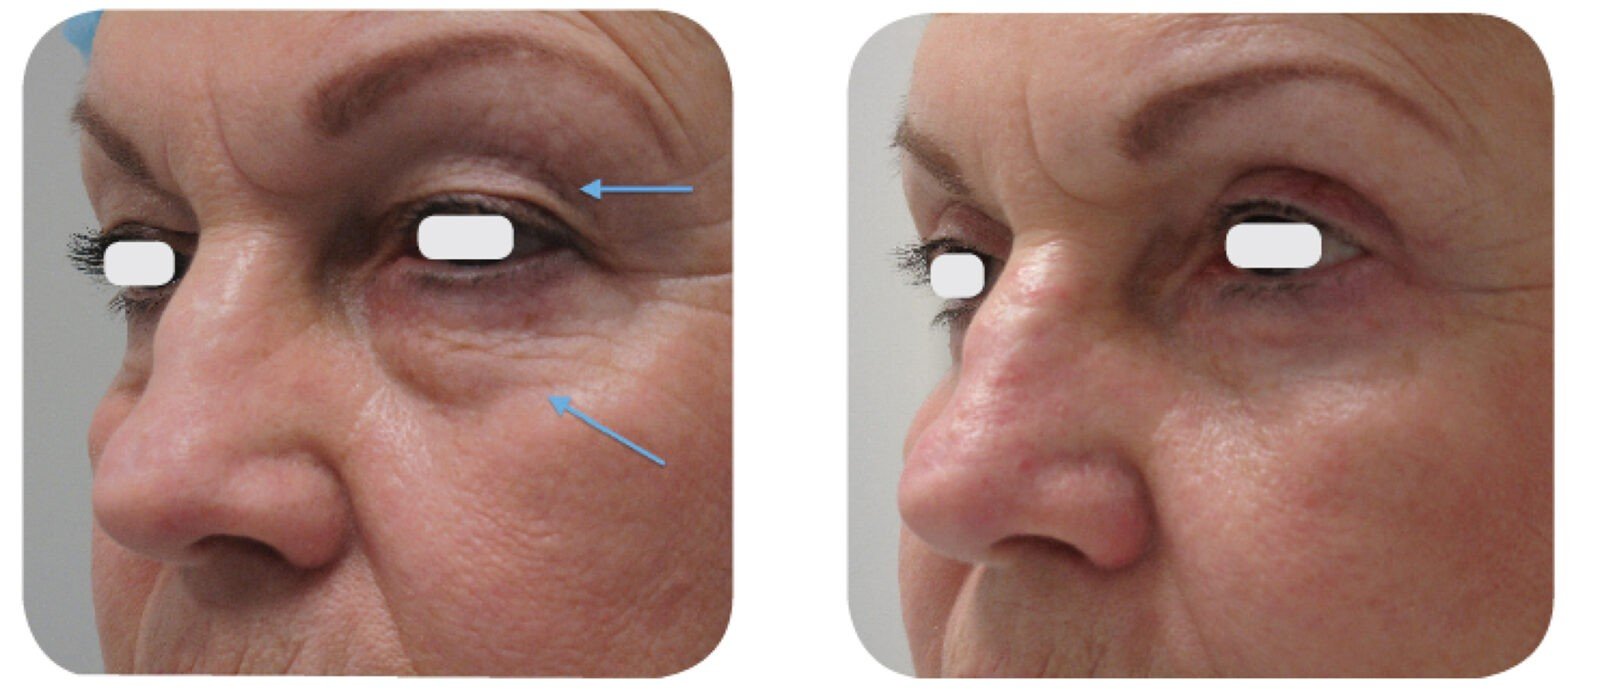
Case report 2 – lower lid blepharoplasty with syringoma removal
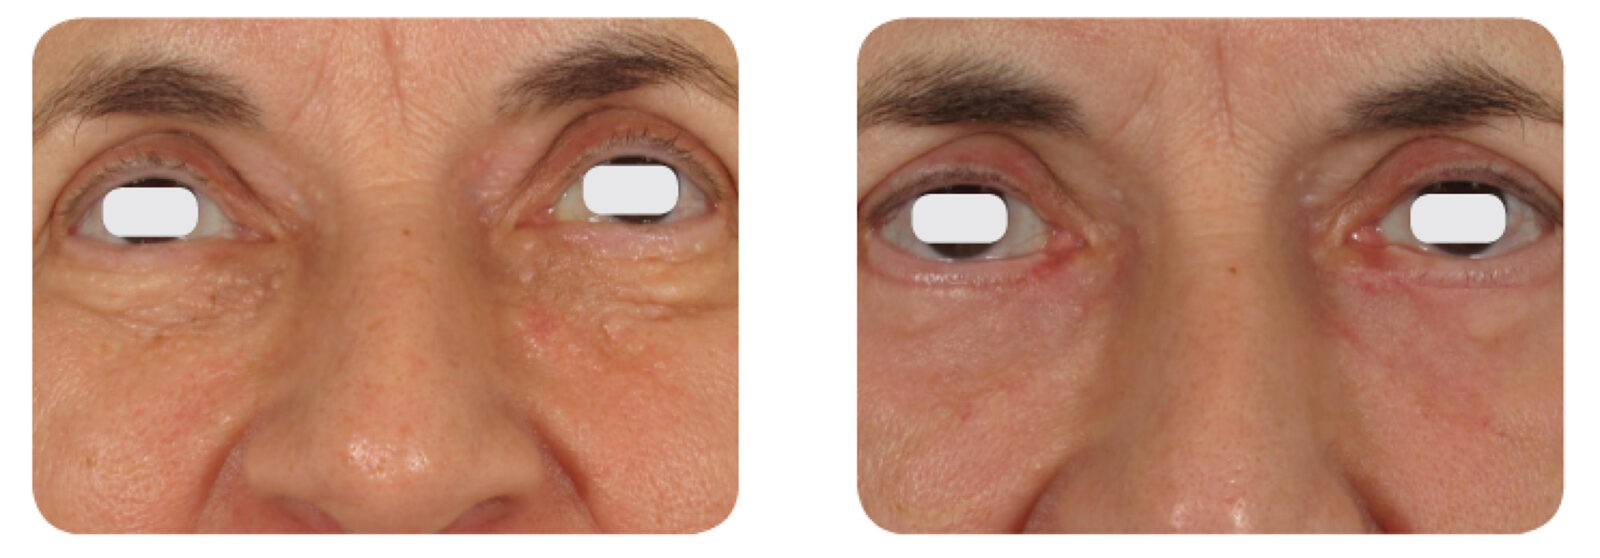
(Left) Baseline: A 64-year old female patient, skin type II. Presents dermatochalsia and extensive laxity of the lower lid in addition to syringomas on the lower lid, extending from the tear trough area to the lid margin. (Right) Postoperative Results: 8 weeks post one session. A transcutaneous skin pinch was planned to excise the excess skin, along with a concurrent C02 ablative laser resurfacing of each syringoma. A linear skin flap was oriented and raised along the subciliary line, approximately 4 mm from the lid margin. Approximately 2.5 mm of skin overlying the muscle was excised. The flap was closed with a subcuticular running non-absorbable suture. Following, syringoma lesions were treated as described in the Syringoma section.
Case report 3 – upper lid blepharoplasty with peri-oral wrinkle treatment with Combo mode
(Left) Baseline: A 61-year old female patient, skin type III. Presents symmetric and bilateral dermatochalasia on the upper lids. Pronounced static creases and lines on the lower lids, extending into the latera canthal area. (Right) Postoperative Results: 6 months post one session. The entire ellipse of skin was elevated and incised with laser. A thin strip of orbicularis oculi muscle was excised in order to expose the orbital septum. The defect in the orbital septum was identified, and herniated orbital fat was exposed. The abnormally protruding positions in the medial with laser and the stalk meticulously cauterized with laser. Afterwards, a single pass of the AcuPulse™ AcuScan120™ in Combo mode was used to resurface the lower lid complex.
Warts
Definition of condition and prevalence
Warts are common crusty papules typically located on the hands and feet. Warts are caused by a viral infection, specifically by one of the many types of human papillomavirus (HPV). Warts that have persisted over one year despite conservative therapy, especially if they interfere with some aspect of the patient’s life, are good candidates for CO2 laser treatment. Advantages of CO2 laser therapy are 1) precise control of the depth of action, 2) sufficient hemostasis in most cases, 3) immediate gratification of having the wart removed and 4) good “cure” rates after one treatment. Even with the large number of available wart treatments, including interferon, 5FU, imiquimod, as well as traditional therapies such as liquid nitrogen, some warts persist. In these cases, the AcuPulse™ can be used as follows.
Patient preparation and treatment limitations
- Patients who object to any risk of scarring and young children (because of the need for injectable anesthesia) should be dissuaded from treatment
- Because of the viral nature of warts, special caution should be brought to the evacuation of the vaporization plumes
- Cosmetically sensitive areas, such as the face, should be approached with extreme caution and with very conservative settings
- Inject lidocaine (2% lidocaine with 1:100,000 epinephrine) under the cutaneous treatment area
- Place on a sterile field adjacent to the treatment site, saline-soaked and dry gauzes
- The operative area should be surrounded by wet gauze or moistened towels to decrease the risks of inadvertent targeting of normal skin.
Treatment procedure
1. Connect the black incisional 125 mm handpiece directly to the articulated arm of the AcuPulse™ device.
2. Enter Manual mode.
3. Select settings for the various steps as indicated in the table below.
| Procedure Step No. |
Mode | Emission mode | Power (W) |
| 1 | Manual | CW | 10-15 |
| 2 | Manual | CW | 10-15 |
| 3 | Manual | CW | 4-7 |
4. Step 1: A rapid sweeping motion is made over the wart with the handpiece defocused (pulled back about 1-2 cm from the surface) to coagulate the surface. The goal is to move quickly so as to minimize carbonization. Residual debris are wiped away with a saline-soaked gauze. Also, an outer rim of about 2-5 mm from the clinically obvious wart should be heated.
5. Step 2: Repeat step 1 layer by layer with intermediate wet gauze wiping until a clean dermis free from any verrucous tissue is noted.
6. Step 3: Once the area is found to be free of verrucous tissue, the entire area is exposed to a defocused beam. This causes heat coagulation and heat denaturation of the collagen bundles with a resultant contraction (shrinking) of the wound. Once shrinkage in observed at the wound base, the dermis has been reached and treatment is stopped.
Post-op care
Vaseline is applied to the surface and a dry sterile dressing is applied. The patient should cleanse the area with a gentle soap daily and reapply the ointment. Facial and lip lesions will generally heal in 7-10 days, whereas hand and foot lesions might require a full 3 weeks to heal. The wound is examined 2 weeks later to ensure uneventful healing.
Treatment notes and conclusion
The ability to provide precise ablation and coagulation in a mode where the physician has full control over laser parameters and its delivery makes the AcuPulse™ a viable and convenient alternative for wart removal on solitary or multiple (mosaic verruca) recalcitrant lesions.
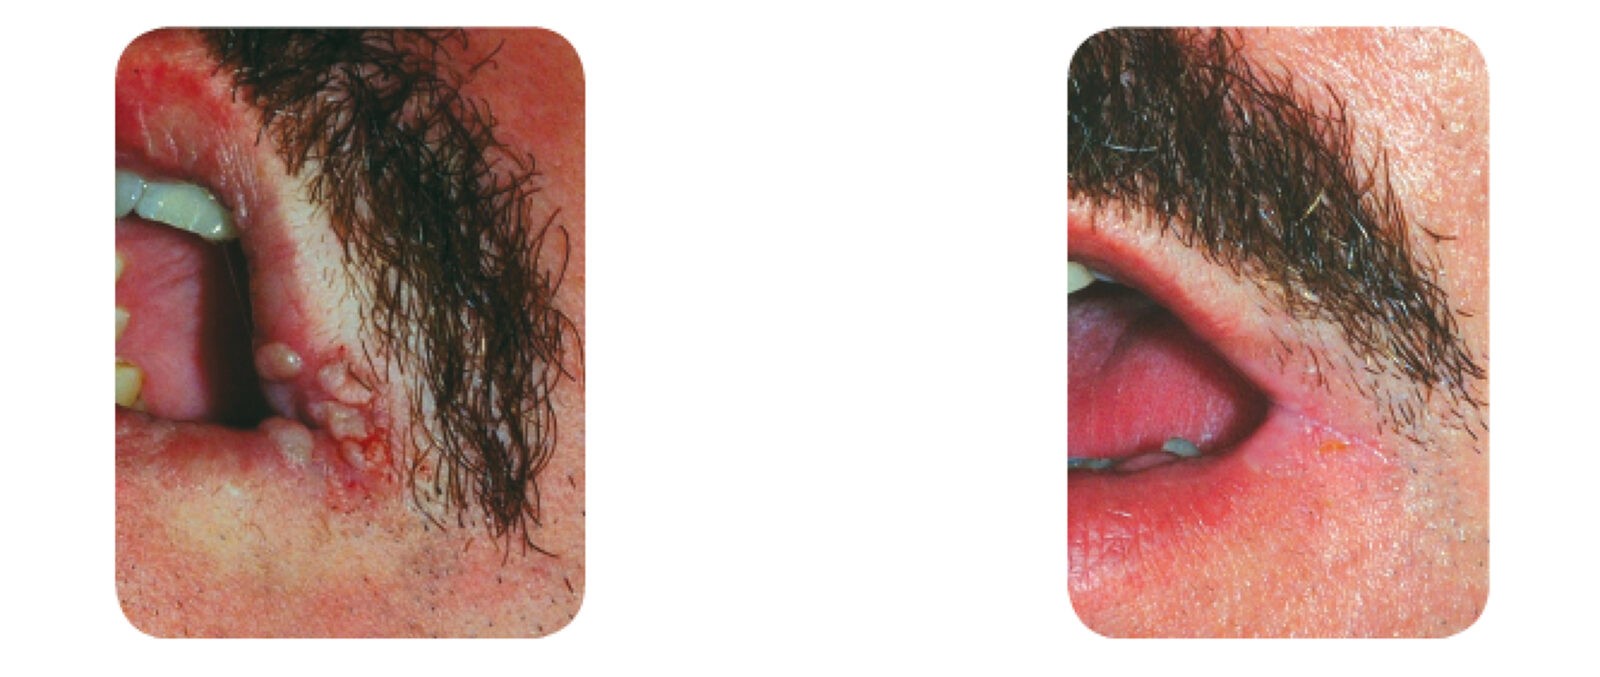
(Left) Baseline: A 35-year old male patient, skin type II. Presents verruca on the lip. (Right) Postoperative Results: 3 months post one session.
Combining vascular lasers/IPL with a CO2 laser
Definition of condition and prevalence
- There has been an increasing trend toward combining vascular laser or IPL with CO2 into the same session. Although the AcuPulse™ CO2 laser capably reduces pigment dyschromias, the CO2 laser cannot be expected to clear telangiectasia. Accordingly, for a patient with a combination of pigment dyschromias, telangiectasia and fine lines, one can combine the CO2 laser, either in the same session or in sequential sessions, with a vascular device
- Patient preparation and treatment limitations
- Patients with skin of color or severe cases of rosacea, as well as patients seeking treatment of extra-facial areas should be dissuaded from treatment
- Numbing of the patients should be preferably applied after the IPL procedure, as it might have a vasoconstrictive effect prejudicial to the outcome on the erythematous components
- Preventive medications applicable to ablative procedures are at the physician’s discretion.
Treatment procedure
1. Connect the M22™, enter Skin Treatment mode.
2. Select settings for the various steps as indicated in the table below.
| Procedure Step No. |
System/module | Setting ranges |
| 1 | M22TM/IPL | 560-590nm filtersDouble pulsePulse durations: 3-5 msDelay time: 10-30 msFluence: 14-20 J/cm² |
| 2a – Full resurfacing | AcuPulse™/SurgiTouch™, 200 mm handpieceFeatherTouch mode | Round scan size: 4-11Power: 18-24 WOff time: 0.5-1 sCW mode |
| 2b – Fractional resurfacing | AcuPulse™/AcuScan120™ComboTM mode | Deep: 10-17.5 mJ, Density: 5-15%Superficial: 50-90 mJ, Density: 40-60% |
3. Step 1: Either apply to individual telangiectasia or areas of diffuse redness and/or dyschromia.
4. Step 2a: If full resurfacing is performed: Remove the IPL coupling gel. Connect the SurgiTouch™ scanner to the AcuPulse™ with the 200 mm grey handpiece. Enter FeatherTouch mode. Normally for a 5 day recovery, apply 24 W. When working around convex or concave surfaces, smaller sizes are used to navigate precisely around “nooks and crannies”. Over broad flat areas (i.e. the forehead or cheeks,) larger scan sizes are used to increase coverage rate. Also, the off time is increased for larger scans to allow for precise placement of adjacent scans (i.e. from 0.5 sec for smaller scans to 1 sec for larger scans).
5. Step 2b: If fractional resurfacing is performed: Remove the IPL coupling gel. Connect the AcuScan120™ scanner to the AcuPulse™. Enter Combo mode. About 10-20% overlap should be achieved between adjacent scans.
Post-op care
Dress the area with petrolatum ointment. Over the next 5 days the patient should cleanse the skin with a gentle soap free cleanser and reapply the ointment.
High SPF sun protection is of prime importance for at least 2-3 months after the treatment to avoid any transient hyperpigmentation issues.
Treatment notes and conclusion
The combination of the M22™’s IPL with the AcuPulse™’s powerful resurfacing modes produces an effective synergy. Patients gain a double psychological benefit of the immediate results of the vascular component and the continuous improvement of the resurfacing.
Case report 1 – full face combination with M22™ IPL prior to AcuPulse™

(Left) Baseline: 41-year old female patient, skin type II-III. Presents moderate photoaging, on the full face, with mild peri-oral rhytids. (Right) Postoperative Results: 4 months post one session of IPL and AcuPulse™ (M22™ IPL followed by AcuPulse™ Combo™ mode, using the AcuScan120™)
Case report 2 – full face combination with M22™ IPL prior to AcuPulse™

(Left) Baseline: 36-year old female patient, skin type II. Presents dyschromia, elastosis and rhytids. (Right) Postoperative Results – 3 months post one session with IPL and AcuPulse™ (M22TM IPL followed by AcuPulseTM FeatherTouchTM mode, using the 200 mm grey handpiece with the SurgiTouch™ scanner, 24 W).
PB-1005509