


Helena Cherhava explains why digital facial design is such an effective method for the detailed, accurate planning of aesthetic treatments

is a lecturer at the Department of Maxillofacial Surgery and Dentistry of the Ukrainian Military Medical Academy, Ukraine
email: [email protected]
THE RANGE OF AESTHETIC MEDICINE SERVICES ON OFFER continues to grow significantly each year. Doctors from a range of specialties (plastic surgeons, dermatologist, injectors, ophthalmologists, dentists) work in the field of anti-ageing therapy and facial beautification, which is why a detailed analysis and competent, comprehensive, individualised planning of future manipulations is an important stage in modern aesthetic medicine today.
The demands from our patients are also changing. Patients are more confident and, due to digital technology, clear about what they want to achieve. That’s why digital face design is a great tool for the rapid visualisation of all the changes the patient will undergo and accurate calculation of the volume, type, and stages of future multi-stage interventions.
What digital face design can bring to your daily practice:
- It is an element of modern documentation
- Provides the chance to qualitatively analyse an initial situation, to plan manipulations and to choose the correct chronology of their combination
- Is an excellent educational material since it allows you to objectively compare the results of previous treatments
- A perfect way to quickly share information with colleagues even if they practice in other cities or countries
- Is a motivating factor for patients and advertising for the doctor.
Digital face design allows the practitioner to analyse the anatomy of the patient’s face and plan the treatment and its application with the ongoing approval of the patient, who is better informed about the procedure and the results they can expect.
Materials and method
It should be noted that this technique of analysing the patient’s appearance has a clear protocol. Therefore, it is important to follow it to ensure the objectivity of the planned results.
In this case, the necessary elements of the technical equipment are a professional digital camera, software (PowerPoint or Keynote) and two-way flash.
The first step is to take quality photos of the patient
A classic photo protocol usually consists of 14–26 photos.
The first group of photos is a front view, a profile on both sides, and at a 45-degree angle between the profile and front view. The images are taken with the patient in a restive state, as well as expressing emotions (conversation, open mouth, light smile and wide smile). These photos must be taken so that the camera lens is strictly at the level of the patient’s pupils. This is important to maintain the natural proportions of the patient’s face.
The second group of images are macro photos of the problem area. They are performed in the same positions as the first group, but only the area under consideration for treatment is captured at close range.
The third group of photos is from the specific angles to a particular patient, such as patients pose as they usually would for a photograph. Patients choose angles independently. In addition, at this stage, it is important to show the patients their photos and ask them to choose the ones that they like the most. This will give the practitioner a lot of information about when the patient feels satisfied with their appearance.
At our practice, we also like to take a fourth group of artistic photos. This group is certainly optional, but the purpose of these photos is to develop a more creative approach in the practitioner. They also work well to promote your work because they are aesthetic and attractive. Usually, the process of taking all photos lasts between 10–15 minutes.
The important thing about taking photos is that we use a professional camera. It is this device that provides images with the true size and proportions of a person’s face.
It should be remembered that every face is unique, especially when displaying emotions. Therefore, it is always necessary to emphasise facial analysis with each patient and all the changes to the facial contours that are visible when emotions are displayed.
There are two types of smiles: forced and unwilled. The forced smile (social) is voluntary, static and the patient can reproduce it perfectly at any time. However, it is not important for proper analysis of the patient’s face.
An unwilled (spontaneous) smile is a manifestation of real emotions, a person’s joy. This smile is more difficult for the patient to reproduce on demand. It appears on the face only in a moment of happiness and pleasure. It is this type of smile that the doctor must ‘catch’ for analysis and planning of future treatments.
Another important moment of facial expressions is the change of expression when talking. The patient’s mouth is slightly open in such situations. These photos are especially important for planning minimally invasive interventions of the perioral area.
If the doctor also needs to record the initial colour of certain areas of skin, we recommend using additional lighting, e.g. camera flashes, because it makes it possible in any weather and regardless of the quality of natural light to provide the same conditions for the transfer of colour indicators of the skin, mucosae, and teeth.
The market offers many types of additional lighting. We recommend the twin mini flash, which is fixed directly to the camera or purchase two standard softboxes.
The advantage of mini flashes is their compactness and mobility. The main advantage of softboxes is the extremely high quality of the output photo and the ‘silky’ artistic appearance of all images.
In order to objectively capture a photo at all stages of treatment, it is necessary to ensure the camera is set to the same parameters for all images. In our practice, the digital indicators are as follows: shutter speed — 1/125, aperture — 19–25, ISO 100. White balance is set according to Kelvin and is 4900–5600. Portraits are usually taken in autofocus mode, and macro photos are taken with manual focus.
The RAW photo format should be preferred over JPEG, as many errors can be corrected in RAW photos. For example, the practitioner ‘caught’ a successful shot of a specific facial expression, but there was an error in one of the other parameters. The same kind of moment can be fixed on Raw photo and the frame can be used for future reference.
The next step is to analyse the patient’s face
Facial analysis is performed using reference lines from which standardised parameters have been developed for frontal and profile views of the face. The horizontal reference lines used in the frontal analysis include the interpupillary and intercommissural lines that provide an overall sense of harmony and horizontal perspective in an aesthetically pleasing face. While the vertical reference lines include the facial midline, dental midline and mandibular midline. These are checked against each other to assess symmetry. Symmetry can also be assessed by dividing the face into horizontal thirds and vertical fifths that measure facial proportions. The parameters used for profile analysis include the facial profile angle that can indicate the underlying skeletal pattern, as well as the Ricketts’ aesthetic plane. The rest of the additional lines the doctor forms individually depending on the ‘problem area’ of the patient and their vision of solving the situation.
Case analysis using digital face design usually takes the practitioner about 20–30 minutes. In most cases, this is enough time to create an accurate step-by-step treatment plan, easily coordinate it with a team of specialists and an accessible explanation to the patient.
To motivate the patient and effectively present your treatment plan, the practitioner can introduce it in a presentation format on a large screen or projector. This is how we present most ‘treatment projects’ to our patients in a clinic.
The convenience of digital design also means that the practitioner can discuss clinical cases and discuss techniques with both colleagues and patients in different countries. And it will always be easy for the practitioner to explain the situation, the choice of methods, and the chronology of interventions.
Results and discussion
When assessing a clinical case, we consider the step-by-step planning of interdisciplinary work in a digital format. The digital face design consists of the following steps:
- Take the initial high-quality digital photos
- The next step is the analysis of the patient’s face and digital planning of future procedures. We begin by transferring images to a presentation programme
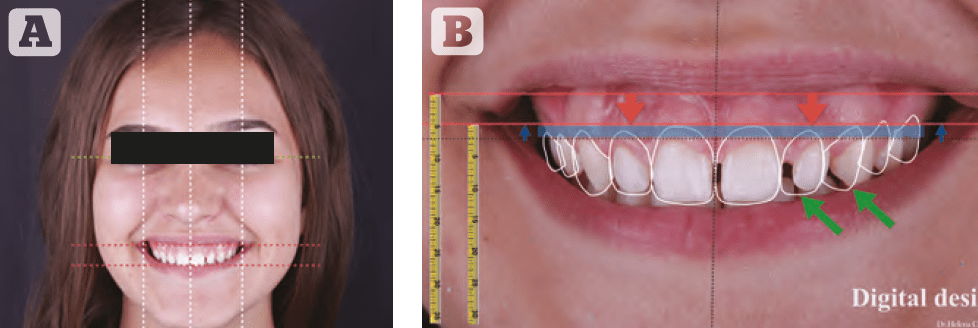
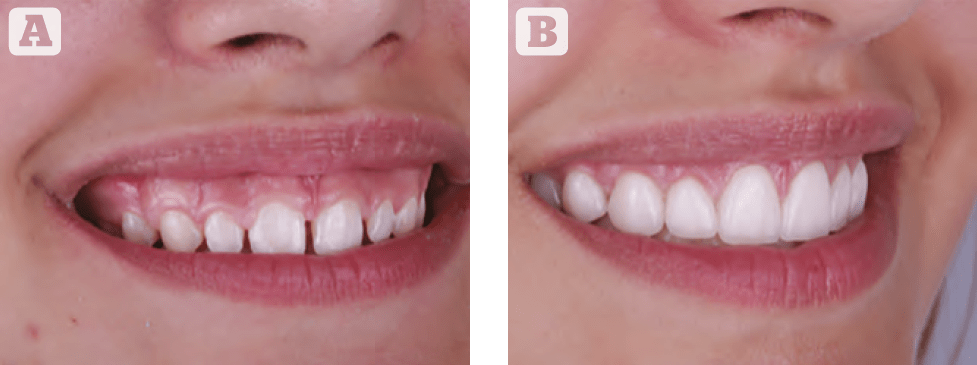
- (Keynote or PowerPoint). After transferring the images, we check the proportions of the face and graphically depict all future interventions and their chronology (Figure 1A). Figure 1B shows a plan for future interventions. In this case, the blue colour indicates changes of a surgical nature, the white colour reflects changes in the field of aesthetic dentistry, and red denotes the area of minimally invasive intervention (botulinum toxin therapy).
- Implementation of digital face design in practice. Now the doctor (or team of doctors) turns to the implementation of the treatment plan. In this case, first of all, surgical lengthening of the clinical dental crowns is performed.
- Next comes the correction of the anatomy of the teeth with ceramic veneers.
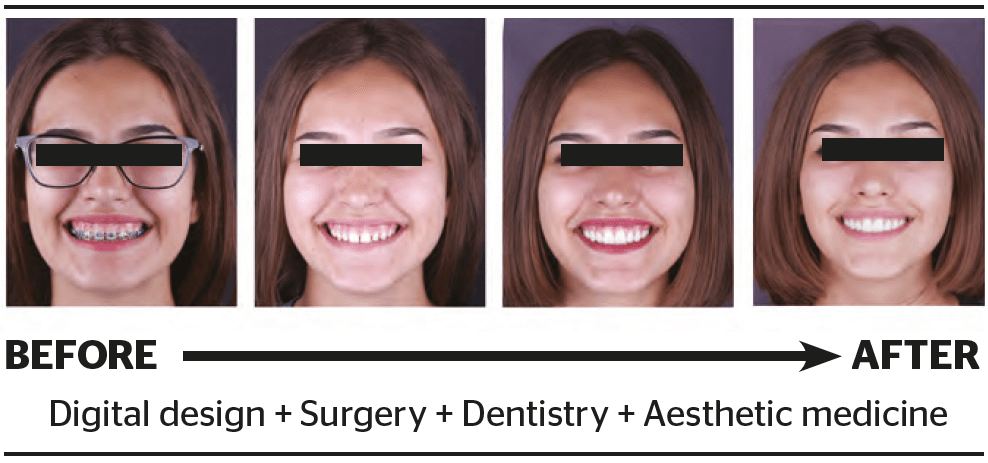
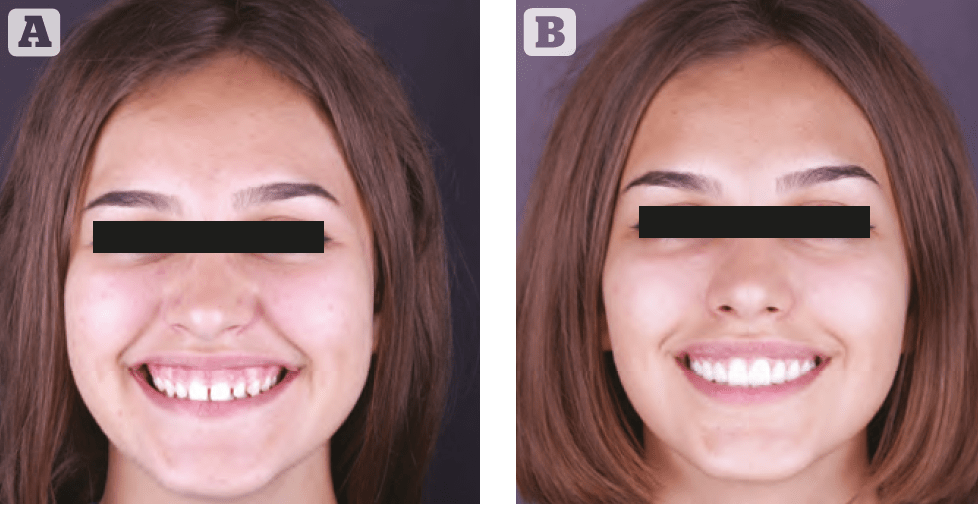
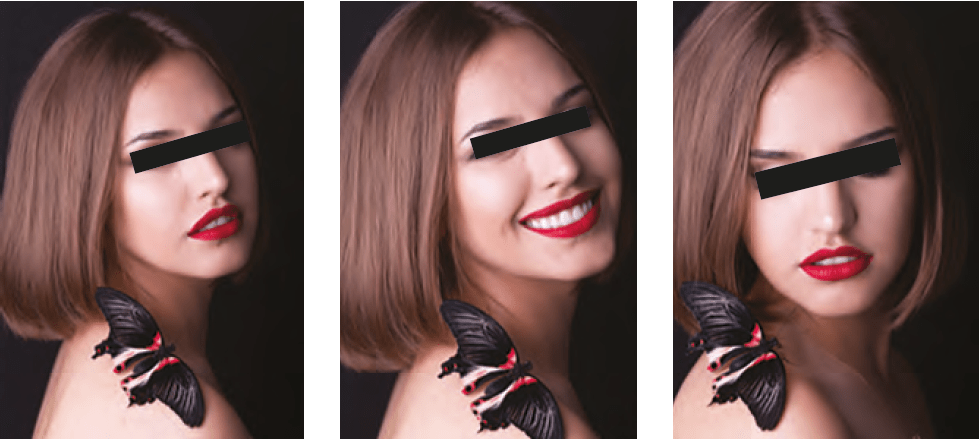
As a final stage, botulinum toxin type A injections were used to correct the activity of the levator labii superioris alaeque nasi. This manipulation ensured the absolute harmony of the patient’s face during any displays of emotion (Figures 2–4).
Therefore, our preliminary analysis using digital face design made it possible to easily individualise the treatment plan and achieve accurate predictions, comprehensive results, and harmony in the patient’s appearance.
Conclusions
Excellence will never be achieved by chance; rather, it comes from a consistent, systematic approach to diagnosis, communication, treatment planning, and implementation. Digital face design will lead to a positive change in your daily work routine and, of course, to better results from your treatments.
Further Reading
- Ali MJ, Ende K, Maas CS. Perioral rejuvenation and lip augmentation. Facial Plast Surg Clin North Am
2007:15:491-500 - Arnett GW, Bergman RT. Facial keys to orthodontic diagnosis and treatment planning. Part II. Am J Orthod Dentofacial Orthop 1993;103: 395–341.
- Barton FE Jr, Carruthers J, Coleman S, Graivier M. The role of toxins and fillers in perioral rejuvenation. Aesthet Surg J 2007; 27:632-640
- C. Coachman, M.A. Calamita, N. Sesma. Dynamic documentation of the smile and the 2D/3D digital smile design process. Int. J. Periodontics Restorative Dent., 37 (2) (2017), pp. 183-193
- Coachman, C., Van Dooren, E., Gürel, G., Landsberg, C.J., Calamita, M.A., Bichacho, N., 2012. Smile design: from digital treatment planning to clinical reality. In: Cohen, M. (Ed.). Interdisciplinary treatment planning, vol. 2, comprehensive case studies. Quintessence, pp. 119–174
- MorleyJ, EubankJ.Macroesthetic elements of smile design. J Am Dent Assoc 2001;132:39–45
- Janzen E. A balanced smile – a most important treatment objective. Am J Orthod Dentofacial Orthop 1997;72:359–372


